We, PWFT GmbH, carry out quality tests on random samples of multi-blade shaving systems as an independent service provider.
Using engineering methods, patented test procedures and high-resolution measuring equipment, we regularly check quality-determining product features that are relevant to the customer.
The test results are based on the quality perception of the product user. Our goal is the reliable and repeatable determination of quantitative and thus comparable characteristic values. By returning the test results to the manufacturer,
we strive for sustainability and live the process of continuous improvement.
We have in-depth knowledge and extensive experience in the assessment of cutting tools. As a team of scientists and engineers, we have acquired our know-how in research and industrial projects. We have developed the methods for optical
assessment and cutting ability evaluation in cooperation with universities, technical colleges and industrial companies.
During the visual inspections, the products are examined from the consumer's point of view by an experienced inspector.
- Inspection procedure - Step 1: Analysis of the condition of the packaging
- Inspection procedure - Step 2: Analysis of the firm fit of the test items in the dispenser
- Test sequence - Step 3:
Removal of the test items from the dispenser to test the interface between the handle and the cartridge.
- Test sequence - Step 4: Analysis of the product condition by visual inspection
- Test procedure - Step 5: Microscopic analyses
During the microscopic analyses, the samples are examined with a 10 to 200x magnification using a high-resolution digital microscope. This allows previously documented anomalies and defects to be analysed and measured more precisely. Based on the measurement, these spots are quantified and documented by video and image recordings.
For the contactless measurement of the test specimens, the products are scanned linearly in the shaving area (front side) with a confocal point sensor and geometrically measured.
- Test procedure - Step 1: Measuring the samples
In order to obtain as accurate a statement as possible about the geometry of the test specimens, a previously defined number of measurement lines are run along the shaving area. The measurement data is made available as raw data and converted into interpretable characteristic values using a calculation algorithm.
- Test procedure - Step 2: Analysis of the measurement data and documentation
The previously defined limit values are checked on the basis of the characteristic values determined by measurement. The measurement of the test specimens takes place as a downstream process to the visual inspections. During the visual analyses, conspicuities and defects are detected and quantified via the geometry (area). By measuring the test specimen, characteristic values (e.g. blade angle, blade distance) are determined on the basis of measurement data in the micrometre range and conclusions are drawn about the manufacturing quality with regard to dimensional accuracy and compliance with manufacturing tolerances. The most characteristic values of a multi-blade shaving system are the blade angle, the blade distance and the blade height position in relation to the reference plane of the cartridge, which determines the contact to the human skin during shaving. These main and other secondary parameters are stored on the basis of measurement data.
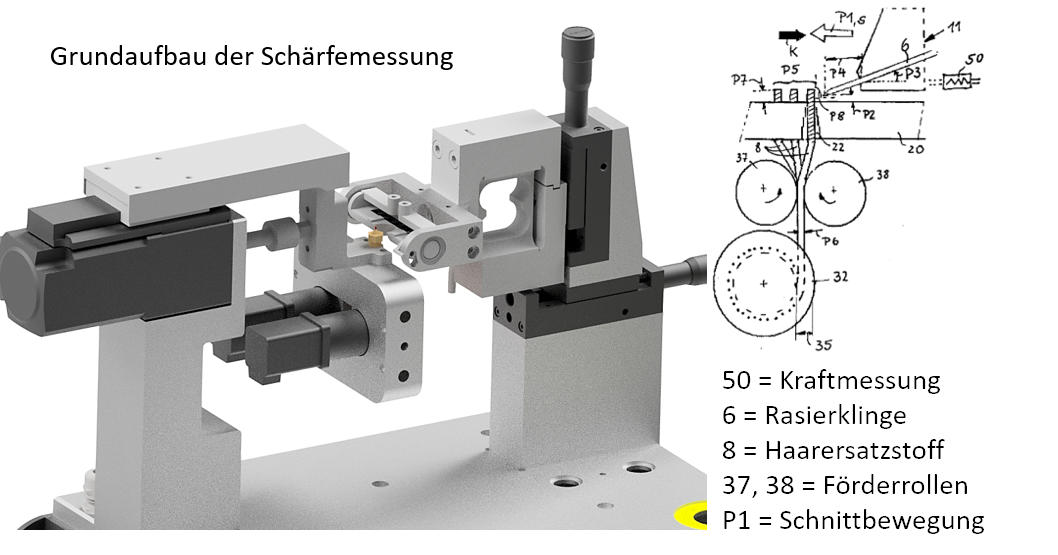
The PWFT uses a patented test method to determine these two characteristics. With the testing device developed by PWFT, quantified characteristic values for the evaluation of the parameters cutting ability and edge retention can be measured automatically. It is a destructive testing method in which individual blades are detached from the cartridge and tested until a limit value is reached. The basic principle of the patented arrangement is based on the recording of force-displacement curves during the repeated cutting of a hair replacement material (test medium). Forces and travel are recorded during the relative movement between the razor blade and the test medium. The result is the course of the forcecurve acting on the razor blade, i.e. during the cutting process in which the test medium is severed. From this, characteristic values such as the maximum force during the cutting process can be determined. These are used to assess the application-related product characteristics of cutting ability and cutting retention.
- Test procedure - Step 1: Attaching individual blades in the test device
- Test procedure - Step 2: Cutting force measurements
The initial cutting ability of the blade is calculated from the arithmetic mean of the maximum forces of the first five cuts. This sharpness value correlates to the "perceived sharpness" and is an indicator for the quality of the blade (following DIN EN ISO 8442-5: ICP value). The razor blade edge retention (durability) is expressed by the maximum possible number of cuts until a force limit value is reached. The force limit value corresponds to an approximated value that pre used razor blades would reach in the cutting performance test. The cutting force measurements are performed with previously defined process parameters.
- Test procedure - Step 3: Documentation of measured values
Documentation of measured values based on force-displacement curves for each cut as well as the maximum forces per cut.
The test results, image and video material as well as the measurement data are documented in a monthly test report and made available to the client. Critical deviations from test characteristics are forwarded immediately irrespective of this. The product manufacturer reviews the results and incorporates them into their quality improvement process.


